
Overview #
NORVI X is a next generation modular industrial controller designed to power smart automation and IoT solutions. Built around a CPU module and a range of plug and play expansion modules, the platform scales from a handful of I/O points up to 200, giving system integrators, OEMs, and industrial engineers a flexible foundation for automation, remote monitoring, and data acquisition projects.
The NORVI X-UART-IO is a versatile serial communication expansion module for this platform, providing RS485, RS232, and UART interfaces for connecting industrial devices, sensors, meters, and legacy peripherals. Rather than dedicating separate pins to every port, the module shares MCU I/O lines with intelligent, firmware-controlled switching – so multiple physical ports are supported while minimizing processor pin usage. The X-UART-IO is not standalone; it must be paired with a NORVI X CPU module (e.g. CPU ESPS3 X1).
This guide covers everything needed to confidently install, wire, and commission the module, including safety requirements, technical specifications, terminal and address configuration, wiring steps, software setup, diagnostic test code, and troubleshooting.
Key Features #
- 1 × RS-485 communication port
- 1 × RS-232 communication port
- 2 × UART communication ports
- Industrial-grade RS485 and RS232 transceivers (RS485: SN65HVD72DGKR)
- Flexible I/O routing via GPIO- and CS-controlled switching
- UART pins usable as general-purpose GPIO when not configured for UART
- Interface selection fully controlled via firmware – no physical jumpers to move
- DIN rail mountable enclosure with spring terminals
- Plug and play connection to the CPU module through the expansion bus
- CE / EMC compliant (EN 61131-2:2007, EN 61010-1:2010+A1:2019, EN IEC 61010-2-201:2018, 2014/30/EU)
Safety Information #
Warning: Disconnect all power sources before installing, wiring, or servicing the NORVI X-UART-IO. Failure to do so may result in electric shock or damage to the equipment.
- Install and wire this module only if you are a qualified electrician or trained technician familiar with industrial control equipment.
- Confirm the host CPU is running from a regulated 24 V DC supply, since the module draws its power through the expansion port rather than a separate connection.
- RS485 and RS232 lines can pick up induced noise over long cable runs – follow proper cable shielding and grounding practice for field wiring, and avoid running signal cables parallel to AC power or motor wiring.
- Mount the module on a DIN rail inside a suitably rated enclosure. It carries an IP20 protection rating and is not designed for direct outdoor or wash down exposure.
- Keep the operating environment within minus 40 to plus 85 degrees C and avoid condensing humidity.
- Do not connect or disconnect the module from the expansion bus while the system is powered.
- Follow all local and national electrical codes applicable to industrial control panel wiring.
Technical Specifications #
Electrical #
| Rated Supply Voltage | 24V DC |
| Current Consumption | 40mA @ 24V DC |
I/O Specifications #
| RS485 Channels | 1 (selectable) |
| RS232 Channels | 1 (selectable) |
| UART Channels | 2 (multiplexed) |
| RS485 Transceiver | SN65HVD72DGKR |
| UART Logic Level | TTL |
| Power supply | 24V DC, shared with CPU through the expansion port |
| Connector Type | Spring terminal |
Hardware Layout & GPIO Map #
| Terminal | Function |
|---|---|
| RS485-A | RS485 Channel – A |
| RS485-B | RS485 Channel – B |
| RS232-RX | RS232 Channel – RX |
| RS232-TX | RS232 Channel – TX |
| UART-1RX | UART Channel 1 – RX |
| UART-1TX | UART Channel 1 – TX |
| UART-2RX | UART Channel 2 – RX |
| UART-2TX | UART Channel 2 – TX |
| GND | Ground |
This module has no onboard I2C sensor address to set – instead, each physical port pair shares GPIO lines with another port, and firmware selects which one is “live” via two channel-select lines (P1_3, P1_4) on the CPU’s I2C-connected PCA9539 I/O expander (address 0x75 – the same expander used for the X-R4’s relay control and the CS1–CS4 lines).
Mux Configuration Logic #
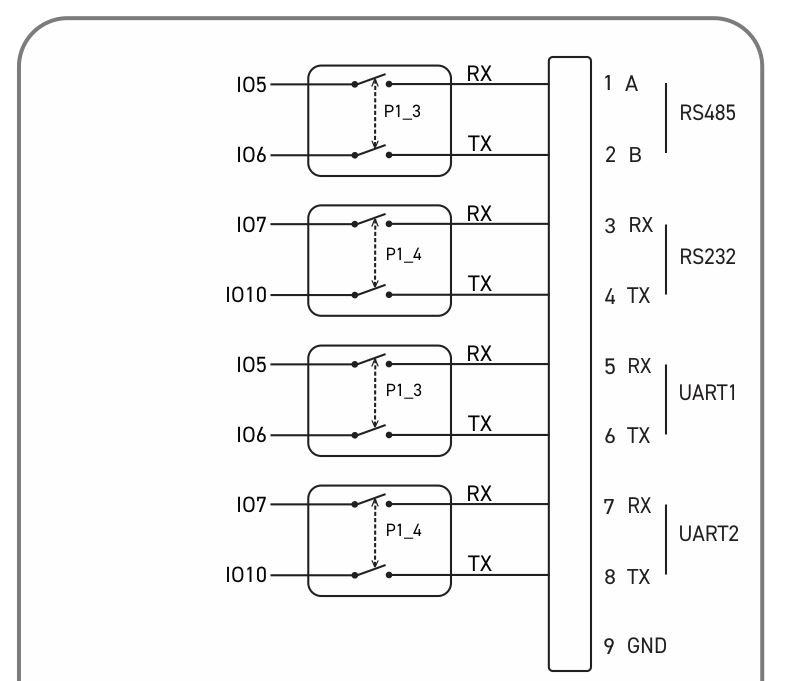
| P1_3 | P1_4 | Enabled Channel |
|---|---|---|
| 0 | x | RS485 (default) |
| 1 | x | UART_1 |
| x | 0 | RS232 (default) |
| x | 1 | UART_2 |
GPIO Utilization #
| Interface | RX | TX | Channel Select |
|---|---|---|---|
| RS485 | IO5 | IO6 | P1_3 (expanded IO, default) |
| UART 1 | IO5 | IO6 | P1_3 (expanded IO) |
| RS232 | IO7 | IO10 | P1_4 (expanded IO, default) |
| UART 2 | IO7 | IO10 | P1_4 (expanded IO) |
Note that RS485/UART_1 share the same physical RX/TX pins (IO5/IO6), and RS232/UART_2 share the other pair (IO7/IO10) – only one of each pair’s two modes can be active at a time, controlled by P1_3 and P1_4 respectively.
Wiring Guide #
GPIO pin assignments for the I2C bus are listed in the Expansion Port table below (Section 6.4); this section covers how to physically wire the module, not the pin numbers themselves.
Power Connection #
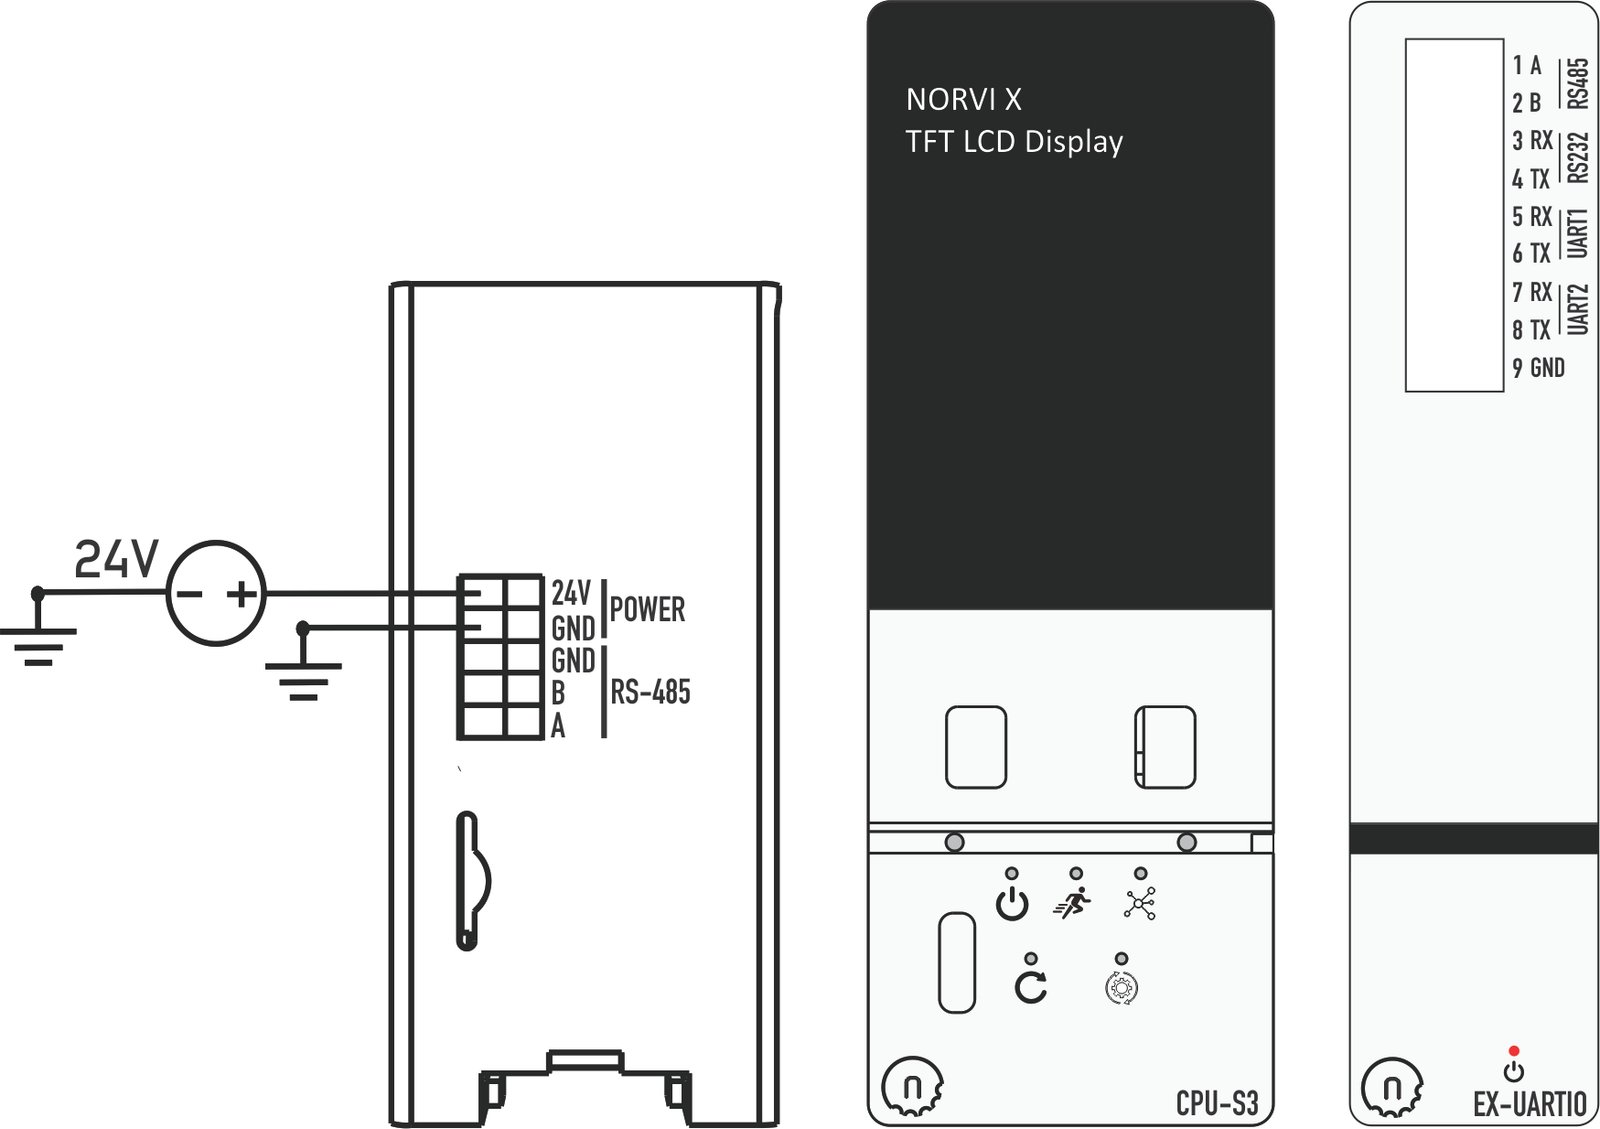
No separate supply needed. Receives 24V DC from the CPU through the shared expansion port, provided the CPU has a regulated 24V DC source with adequate current headroom.
RS485 Wiring #
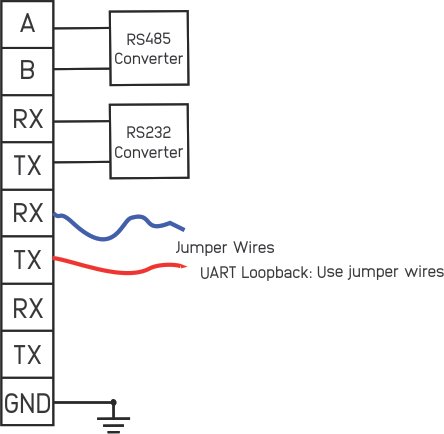
- Connect the field device’s A and B lines to the module’s RS485-A and RS485-B terminals.
- Twisted-pair cable is recommended for RS485 runs; use shielded cable and proper termination resistors for longer runs per your device’s specification.
- Confirm firmware has P1_3 = 0 (RS485 mode, the default) before relying on this port.
RS232 Wiring #
- Connect the field device’s RX/TX lines to the module’s RS232-RX/RS232-TX terminals (cross-connected: device TX → module RX, device RX → module TX).
- RS232 is a point-to-point, full-duplex interface – not suitable for multi-drop wiring like RS485.
- Confirm firmware has P1_4 = 0 (RS232 mode, the default) before relying on this port.
UART Wiring #
- UART-1 shares terminals with RS485 (set P1_3 = 1 to activate UART_1 instead).
- UART-2 shares terminals with RS232 (set P1_4 = 1 to activate UART_2 instead).
- UART signals are TTL level and do not connect directly to RS232- or RS485-level field devices on this port when in UART mode; TTL UART is intended for direct MCU-to-MCU or TTL-level peripheral connections.
Mounting and Connecting the Module #
- Power off the entire system before touching any wiring or seating the module.
- Mount the X-UARTIO on the DIN rail next to the CPU module (or next to another expansion module already in the chain) and seat it firmly onto the expansion bus connector.
- Decide which interface each shared pin pair will use, and set that in firmware via the P1_3/P1_4 mux control (Section 5.1) – there’s no DIP switch for this, it’s software-controlled.
- Wire your field device(s) to the appropriate terminals for the interface you’ve selected.
- Power the system back on.
- Upload the module’s test sketch from the NORVI GitHub repository to confirm each relay channel switches correctly before wiring it into your final control logic.
Expansion Port (50 pin) #
The NORVI X-UART-IO is read through the host CPU using the Arduino IDE with the ESP32 board package. Firmware examples and required libraries are maintained in the NORVI GitHub repository.
| PIN INDEX | Purpose | GPIO | SOURCE |
|---|---|---|---|
| 1 | MOSI | IO11 | ESP32-S3 |
| 2 | MISO | IO13 | |
| 3 | SCLK | IO12 | |
| 4 | GND | —- | |
| 5 | SCL | IO9 | |
| 6 | SDA | IO8 | |
| 7 | GND | —- | |
| 8 | RX1 | IO18 | |
| 9 | TX1 | IO17 | |
| 10 | GND | —- | |
| 11 | D+ | —- | |
| 12 | D- | —- | |
| 13 | GND | —- | |
| 14 | CS1 | P1_0 | PCA9539 I2C Address 0x75 |
| 15 | CS2 | P0_7 | |
| 16 | CS3 | P0_6 | |
| 17 | CS4 | P0_5 | |
| 18 | IO1 | IO1 | ESP32-S3 |
| 19 | IO2 | IO2 | |
| 20 | IO4 | IO4 | |
| 21 | IO5 | IO5 | |
| 22 | IO6 | IO6 | |
| 23 | IO7 | IO7 | |
| 24 | IO10 | IO10 | |
| 25 | IO11 | IO35 | |
| 26 | IO12 | IO36 | |
| 27 | IO13 | IO37 | |
| 28 | IO14 | IO14 | |
| 29 | RS485_TX | IO15 | |
| 30 | GND | —- | |
| 31 | GND | —- | |
| 32 | RS485_RX | IO16 | |
| 33 | P1_1 | P1_1 | PCA9539 I2C Address 0x75 |
| 34 | P1_2 | P1_2 | |
| 35 | IO21 | IO21 | ESP32-S3 |
| 36 | GND | —- | |
| 37 | GND | —- | |
| 38 | P1_3 | P1_3 | PCA9539 I2C Address 0x75 |
| 39 | P1_4 | P1_4 | |
| 40 | P1_5 | P1_5 | |
| 41 | IO39 | IO39 | ESP32-S3 |
| 42 | IO40 | IO40 | |
| 43 | NC | —- | |
| 44 | NC | —- | |
| 45 | NC | —- | |
| 46 | GND | —- | |
| 47 | 5V | 5V | |
| 48 | GND | GND | |
| 49 | 24V | 24V | |
| 50 | 24V | 24V |
Software Setup (Arduino IDE) #
Board Configuration #
- Install Arduino IDE
Install the Arduino IDE and add ESP32 board support:
Tools → Board → Boards Manager → ESP32
- Connect the Controller
Connect the NORVI X CPU to your computer using the USB interface.
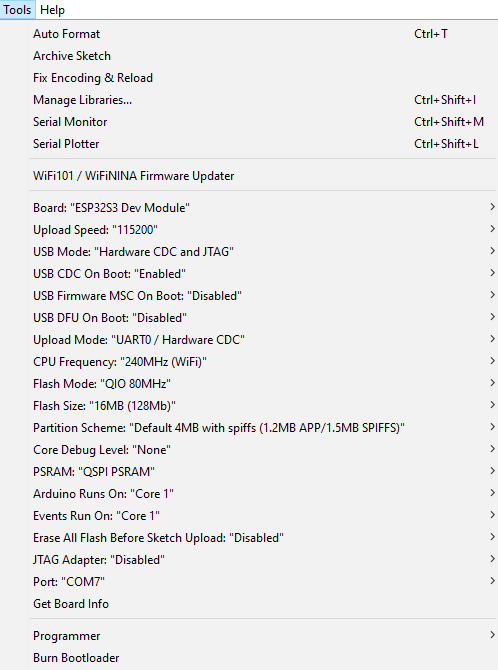
- Select Board and Port
Configure the board and communication port:
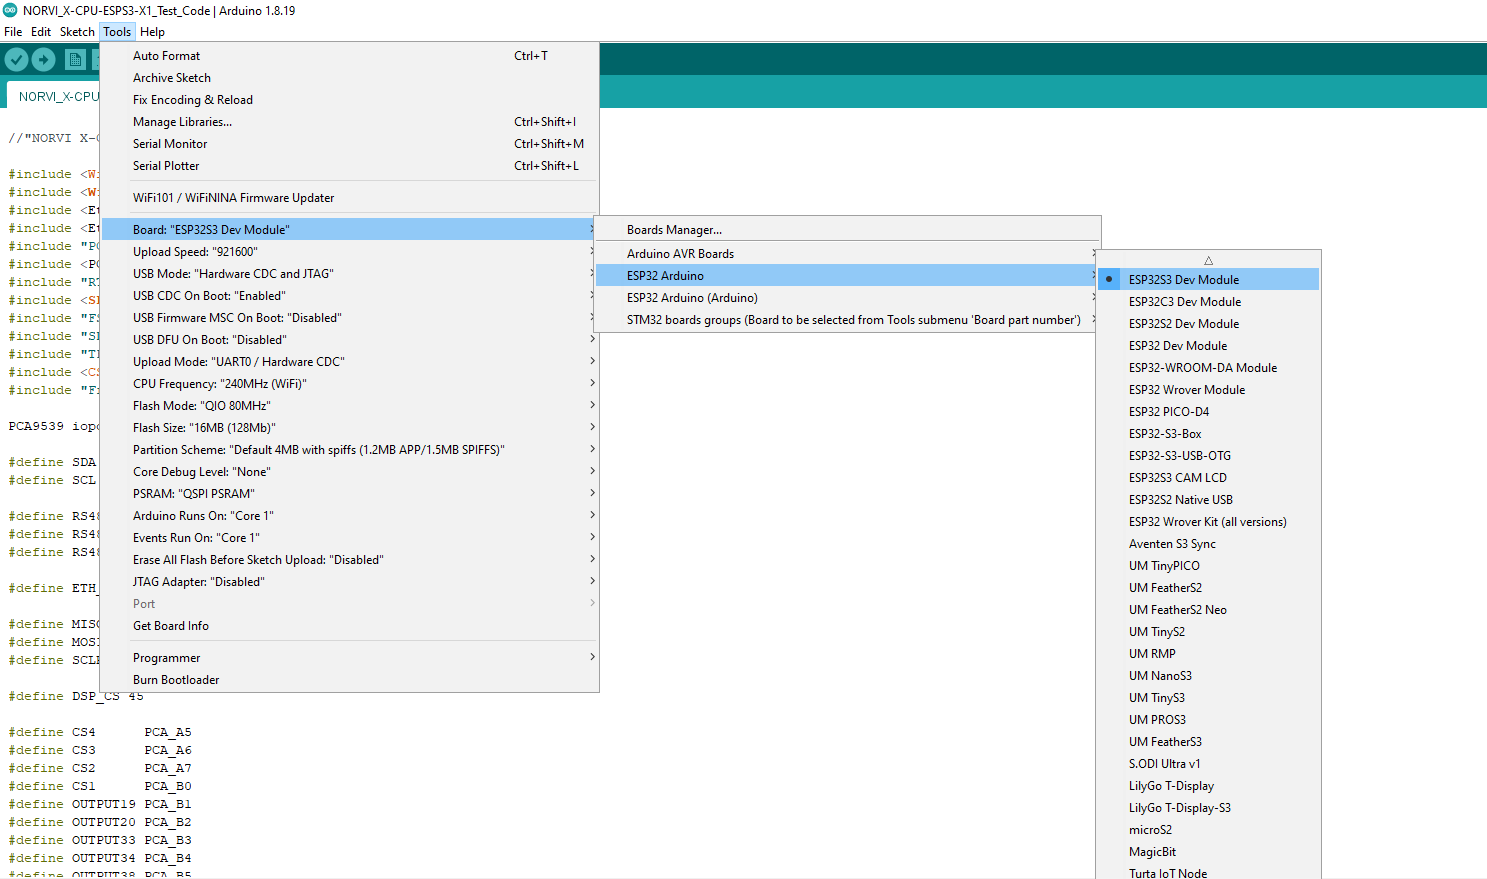
- Tools → Board → ESP32 Arduino → ESP32S3 Dev Module
- Tools → Port → Select the corresponding COM/serial port
- Configure Board Settings
Under the Tools menu, configure the following settings:
| Setting | Selection |
|---|---|
| USB CDC On Boot | Enabled |
| Flash Size | 16MB (128Mb) |
| PSRAM | QSPI PSRAM |
Test Code Examples #
Required Libraries #
Install these via Arduino IDE → Sketch → Include Library → Manage Libraries before compiling any of the examples below:
- Wire
- PCA9539
Install the Required Library #
Install the Wire library through:
Sketch → Include Library → Manage Libraries
Search for Wire and install it if required.
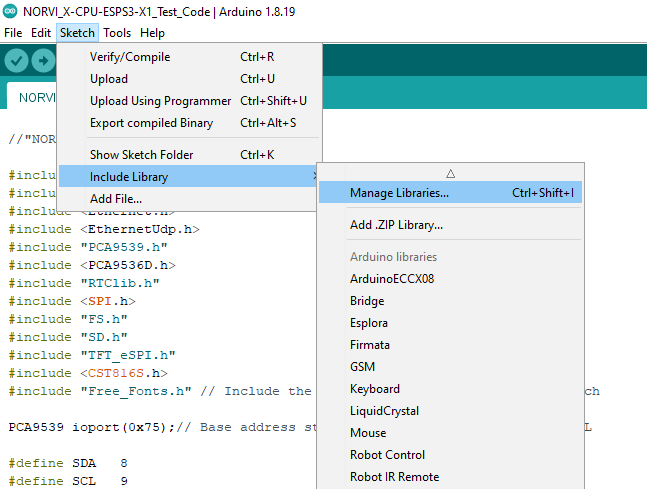
The Libraries are available in the NORVI-X-Version-02 GitHub repository.
Open and Upload the Test Sketch #
- Open the X-UART-IO test sketch from the NORVI GitHub repository.
- Verify the board and port selections.
- Click Upload to upload the test sketch to the NORVI X CPU.
I2C Bus Scan #
Same generic scan code as the other guides – confirms the PCA9539 mux controller (0x75) is present before testing any port.
void I2C_SCAN() {
  byte error, address;
  int deviceCount = 0;
  Serial.println("Scanning...");
  for (address = 1; address < 127; address++) {
    Wire.beginTransmission(address);
    error = Wire.endTransmission();
    if (error == 0) {
      Serial.print("I2C device found at address 0x");
      if (address < 16) Serial.print("0");
      Serial.print(address, HEX);
      Serial.println(" !");
      deviceCount++;
      delay(1);
    } else if (error == 4) {
      Serial.print("Unknown error at address 0x");
      if (address < 16) Serial.print("0");
      Serial.println(address, HEX);
    }
  }
  if (deviceCount == 0) Serial.println("No I2C devices found\n");
  else Serial.println("Scanning complete\n");
}
Selecting an Interface (Mux Control) #
#include <Wire.h>
#include "PCA9539.h"

PCA9539 ioport(0x75); // Base address, confirmed from NORVI's own PCA9539 usage

#define SDA 8
#define SCL 9

void setup() {
  Serial.begin(115200);
  Wire.begin(SDA, SCL);

  // Configure P1_3 and P1_4 as outputs
  ioport.pinMode(P1_3, OUTPUT);
  ioport.pinMode(P1_4, OUTPUT);

  // Example: select RS485 (P1_3 = 0) and RS232 (P1_4 = 0), both defaults
  ioport.digitalWrite(P1_3, LOW);
  ioport.digitalWrite(P1_4, LOW);
}
The exact PCA9539.h pin-naming macros (P1_3, P1_4) and register-level details should be confirmed against the real X-UARTIO sketch
RS485 Loopback / Communication Test #
NORVI’s own RS485 test pattern (used across their older IIoT modules) uses a flow-control pin plus Serial1 for the RS485 UART. Adapted here to the X-UARTIO’s actual RX/TX pins (IO5/IO6) and mux selection:
#define RS485_RX 5
#define RS485_TX 6

void setup() {
  Serial.begin(115200);
  // Select RS485 mode before testing (P1_3 = LOW, per 8.5)
  Serial1.begin(9600, SERIAL_8N1, RS485_RX, RS485_TX);
}

void loop() {
  Serial1.println("RS485 TEST OK");
  delay(1000);
}
Validating the Full Test Sketch #
When the complete test sketch runs successfully with the X-UART-IO attached, you should see:
- Expect: I2C scan finds the PCA9539 at 0x75
- The selected interface (RS485/RS232/UART1/UART2) transmits and/or receives correctly to a connected test device or loopback
- switching P1_3/P1_4 correctly moves communication between the shared pin pairs.
- No I2C errors during mux control.
Troubleshooting #
| Symptom | Suggested Action |
|---|---|
| PCA9539 not detected on I2C scan | Reseat the module on the expansion bus, check the CPU is powered with sufficient current headroom |
| No communication on RS485/RS232/UART | Confirm RTD type DIP switch (PT100 vs PT1000) matches the Confirm P1_3/P1_4 are set to select the interface you’re actually wired to – the shared pins default to RS485 and RS232 actually wired |
| Data garbled or no response | Confirm baud rate, parity, and stop bits match the connected field device |
| Works briefly then stops when another port is used | Two interfaces sharing the same pin pair cannot be active at once – confirm your firmware isn’t toggling P1_3/P1_4 unexpectedly |
| RS485 multi-drop network unreliable | Check termination resistors and cable topology (daisy-chain, not star) per RS485 best practice |
| System resets unexpectedly under load | Check the CPU’s power supply current rating, especially with multiple expansion modules attached |