Setting up environment #
Installing Arduino IDE #
Go to the official website https://www.arduino.cc/ to download the Arduino IDE development tool, download the corresponding library file, install the tool, and click the start icon. Open as shown in the figure below,

Adding ESP32-S3 to Arduino with Board Manager #
Click on the File menu on the top menu bar and click the Preferences menu item. This will open a Preferences dialog box. Look for the textbox labeled “Additional Boards Manager URLs”. If there is already text in this box add a comma at the end of it, then follow the next step. Paste the following link into the text box and click the OK button to save the setting. https://raw.githubusercontent.com/espressif/arduino-esp32/gh-pages/package_esp32_index.json
note that esp32 board version should be 2.0.9.

The tool automatically downloads and updates the corresponding model, check the steps as shown in the figure below,

Note that esp32 board version should be 2.0.9 or below.

Once the installation is completed, select the correct board options for the “ESP32 Arduino” board. In the tools tab, on the board, choose “ESP32S3 Dev. Module”.

Choose the chip and settings according to the chip as shown below,

Setting Up a NORVI ESP32-S3 Camera Web Server #
Download the Camera Web Server program from the link.
Install the Camera Library #
Open the library manager in Arduino, search for OV5640 Auto Focus for ESP32 Camera, and click install.
Install the Wifi Library #
Open the library manager in Arduino, search for Wifi, and click install.
Understand the Autofocus Part of the Code #
sensor_t* sensor = esp_camera_sensor_get();This function call gets the sensor object for the camera, which is needed to configure the OV5640 camera module.
ov5640.start(sensor);The start method of the OV5640 object is called with the sensor object as an argument. This initializes the OV5640 camera with the given sensor settings.
if (ov5640.focusInit() == 0) {
  Serial.println("OV5640_Focus_Init Successful!");
}
The focusInit method initializes the autofocus functionality of the OV5640 camera module. If the initialization is successful, a message is printed to the serial monitor.
if (ov5640.autoFocusMode() == 0) {
   Serial.println("OV5640_Auto_Focus Successful!");
}
The autoFocusMode method enables the autofocus mode of the OV5640 camera module. If this is successful, a message is printed to the serial monitor.
Highlights of the Code #
Make sure to enter the Wi-Fi credentials in the code,
// ===========================
// Enter your WiFi credentials
// ===========================
const char* ssid = "***********";
const char* password = "***********";
Connect the ESP32 Camera and computer through a USB C data cable. Click on the tool on the Arduino software and select the corresponding serial port number.
After compiling, click “upload” to upload the program to the NORVI ESP32 Camera.
On Serial Monitor, you will get the IP address to run the server where you can control the camera.

Navigate to IP address and capture in your browser to capture images. Save the images to your computer for training the model.

Integrating with Edge Impulse #
Create an Edge Impulse Project #
We will use the Edge Impulse for training, a leading development platform for machine learning on edge devices.
Enter your account credentials at Edge Impulse. Next, create a new project and select Espressif ESP-EYE (ESP32) as your target device.
Upload Data for Training #
Go to the Data acquisition tab and upload the images you captured.
Label the images according to the objects you want to detect and save the labels.

Train the Model #
Go to the Impulse design tab and create an impulse with an image data block and image classification.
starting from the raw images, we will resize them (96×96) pixels and so, feeding them to our Transfer Learning block:
Configure the processing and learning blocks and save Impulse.
Pre-processing (Feature generation) #
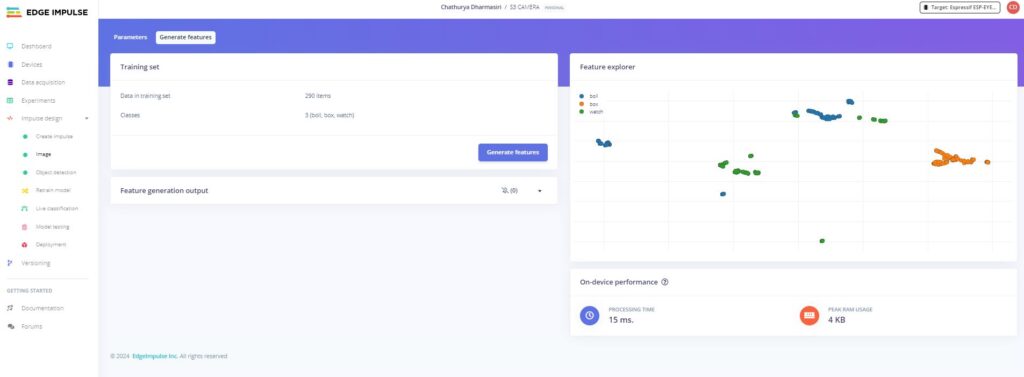
Besides resizing the images, we should change them to Grayscale to keep the actual RGB color depth. Doing that, each one of our data samples will have dimension 9, 216 features (96x96x1). Keeping RGB, this dimension would be three times bigger. Working with Grayscale helps to reduce the amount of final memory needed for inference.
Click Save parameters and then Generate features.

Before training the model, adjust the following parameters.
Train your model with the uploaded images.
Deploy the Model to ESP32-S3 #
After training, go to the Deployment tab and select ESP32 to export your model as an Arduino library.
Modify the ESP32-S3 Code to Use the Model #
Download the generated library and add it to your Arduino IDE by going to Sketch -> Include Library -> Add .ZIP Library.
Under the Examples tab on Arduino IDE, you should find a sketch code under your project name.
Modify the code with corresponding camera chip model and the pin configurations, and also the Auto focus coding part.
Here is the code snippet needed to integrate the Edge Impulse model,
#include "ESP32_OV5640_AF.h"

#define CAMERA_MODEL_ESP32S3_CAM_LCD

#elif defined(CAMERA_MODEL_ESP32S3_CAM_LCD)
#define PWDN_GPIO_NUM    41  //POWER
#define RESET_GPIO_NUM   42
#define XCLK_GPIO_NUM    15  //MCLK
#define SIOD_GPIO_NUM    4   //SDA
#define SIOC_GPIO_NUM    5   //SCL

#define Y9_GPIO_NUM      16
#define Y8_GPIO_NUM      17
#define Y7_GPIO_NUM      18
#define Y6_GPIO_NUM      12
#define Y5_GPIO_NUM      10
#define Y4_GPIO_NUM      8
#define Y3_GPIO_NUM      9
#define Y2_GPIO_NUM      11
#define VSYNC_GPIO_NUM   6
#define HREF_GPIO_NUM    7
#define PCLK_GPIO_NUM    13

#define LED_GPIO_NUM     14
#else
#error "Camera model not selected"
#endif

OV5640 ov5640 = OV5640();

void setup()
{
  Serial.begin(115200);
  sensor_t* sensor = esp_camera_sensor_get();
  ov5640.start(sensor);

  if (ov5640.focusInit() == 0) {
    Serial.println("OV5640_Focus_Init Successful!");
  }

  if (ov5640.autoFocusMode() == 0) {
    Serial.println("OV5640_Auto_Focus Successful!");
  }
  if (sensor->id.PID == OV3660_PID) {
    sensor->set_vflip(sensor, 1); // flip it back
    sensor->set_brightness(sensor, 1); // up the brightness just a bit
    sensor->set_saturation(sensor, -2); // lower the saturation
  }
}
Upload the code to your ESP32-Cam, and you should be OK to start classifying your objects. You can check it on Serial Monitor.
Testing the Model (Inference) #
Processes video stream with the Edge Impulse model, the classification result will appear on the Serial Monitor.


