
Overview #
The EC-M12-BC-C6-A is a battery-powered data logger designed for low-power remote monitoring applications. It combines NB-IoT / LTE-M connectivity with 4–20 mA analog inputs for sensor measurement, enabling efficient and reliable data collection in industrial and IoT environments.
In this use case, the device reads data from a 4–20 mA Diesel Fuel Tank Level Sensor through its analog input and publishes the telemetry securely to Azure IoT Hub using X.509 certificates over TLS.
This guide covers all steps from setting up an Azure IoT Hub account, creating device identities and certificates, configuring the device firmware, to verifying telemetry using Azure IoT Explorer.
Key Features / Highlights #
- Device: EC-M12-BC-C6-A, battery-powered with ultra-low power design.
- Sensor Integration: Supports 4–20 mA Diesel Fuel Tank Level Sensor input.
- Connectivity: NB-IoT / LTE-M for reliable remote telemetry.
- Security: Uses X.509 certificates over TLS for secure communication with Azure IoT Hub.
- Azure IoT Hub Setup: Step-by-step instructions to create an IoT Hub account, device identities, and upload certificates.
- Firmware Configuration: Focused on secure MQTT connection using X.509 certificates.
- Telemetry Verification: How to use Azure IoT Explorer to monitor and validate sensor data.
- Professional Workflow: Includes hardware setup, software setup, operating workflow, and best practices for secure IoT deployment.
Initial setup #
- Firstly, power source is configured as USB by setting on-board jumper to position 2.
- To setup the Arduino IDE to program the STM32L0 microcontroller please refer to: EC-M12-BC-C6-C-A-Initial_setup
- The exported binary file can be uploaded to STM32 microcontroller through a ST-Link Programmer.
- The connections GROUND, CLK, DIO, RESET should be connected with the ST-Link Programmer.
Azure IoT Hub Setup #
This section guides you step by step to create an Azure account, set up an IoT Hub, configure your EC-M12-BC-C6-A device, generate X.509 certificates, and upload them to Azure. Follow the instructions carefully and refer to the screenshots at each step.
Create Azure Account #
1. Sign up for Azure
- Go to Azure Microsoft
- Click Start Free and follow the registration process.
- You will get a free subscription for month with some free credits.
2. Set up your subscription
- After login, navigate to Subscriptions in the portal.
- Make a note of your Subscription ID and Tenant ID; these will be needed later for access control.
Create a New IoT Hub #
1. In the Azure portal, go to Create a resource → IoT → IoT Hub.
2. Fill in the details:
- IoT Hub Name: norvi-iot-hub
- Subscription: Your active Azure subscription
- Resource Group: Create a new resource group, e.g., norvi-iot-hub
- Region: Choose a region closest to your location
- Pricing and scale tier: Start with F1 – Free Tier (good for testing)
3. Click Review + create → Create.
4. After deployment, open your IoT Hub and note down:
- HostName: e.g., norvi-iot-hub.azure-devices.net
- This will be used as the broker URL in your device firmware.
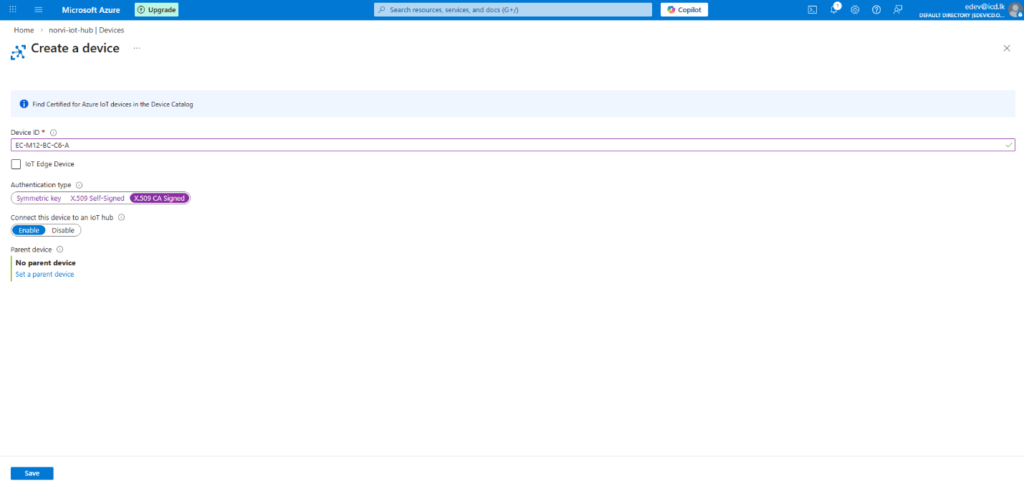
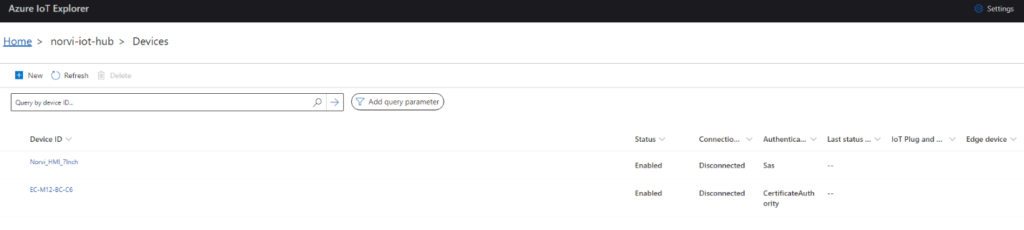
Create a New Device Identity #
1. In your IoT Hub, navigate to Devices → New Device.
2. Fill in device details:
- Device ID: EC-M12-BC-C6-A
- Authentication Type: Select X.509 CA Certificates
3. Click Save to create the device identity.
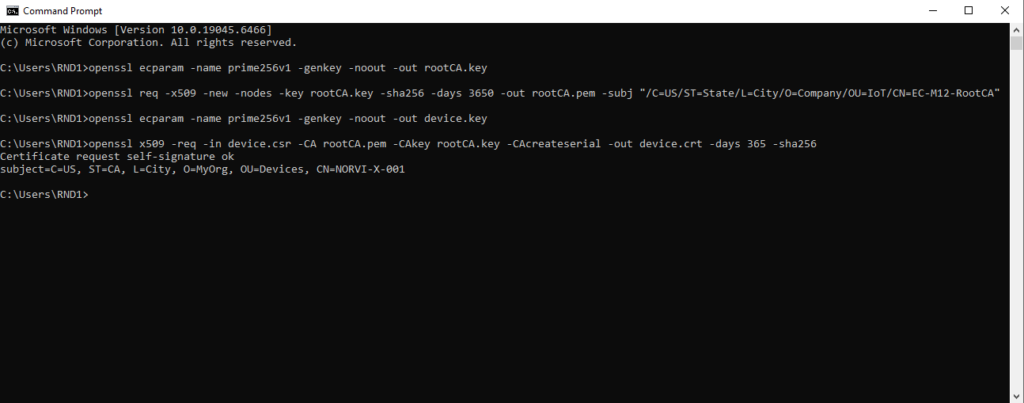
Generate Device Certificates & Private Key #
We need three certificates: Root CA, Device Certificate, and Device Private Key. You can use OpenSSL locally.
1. Create Root CA Certificate
# Generate root private key
openssl ecparam -name prime256v1 -genkey -noout -out rootCA.key

# Generate root CA certificate
openssl req -x509 -new -nodes -key rootCA.key -sha256 -days 3650 -out rootCA.pem -subj "/C=US/ST=State/L=City/O=Company/OU=IoT/CN=EC-M12-RootCA"
2. Generate Device Private Key
openssl ecparam -name prime256v1 -genkey -noout -out device.key3. Generate Device Certificate Signing Request (CSR)
openssl req -new -key device.key -out device.csr -subj "/C=US/ST=State/L=City/O=Company/OU=IoT/CN=EC-M12-BC-C6-A"4. Sign Device Certificate with Root CA
openssl x509 -req -in device.csr -CA rootCA.pem -CAkey rootCA.key -CAcreateserial -out device.crt -days 365 -sha2565. Final Files to Upload to Azure
- rootCA.pem → Root CA certificate
- device.crt → Device certificate
- device.key → Device private key
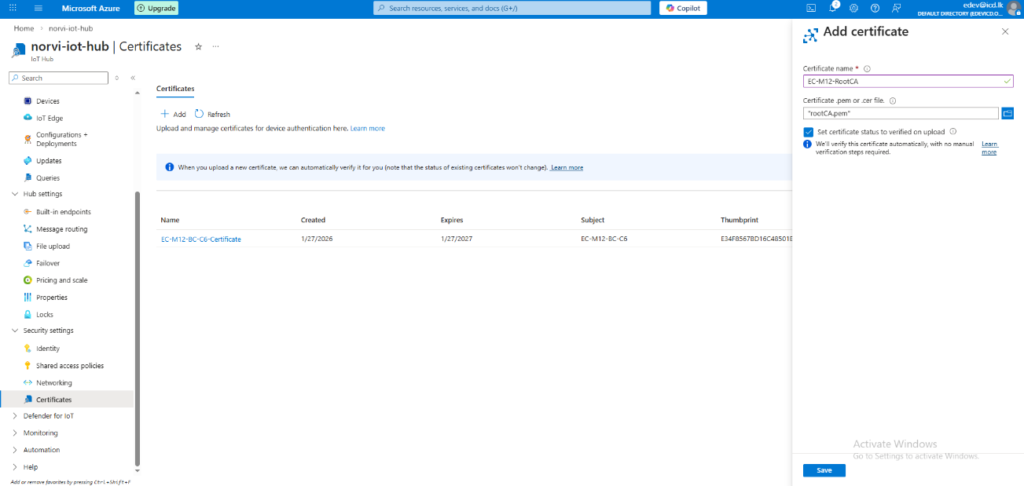
Upload Certificates to Azure #
1. In Azure IoT Hub, go to Certificates → Add.
2. Upload Root CA Certificate
- Click Add → Choose rootCA.pem
- Enter a friendly name, e.g., EC-M12-RootCA
- Put a tick on set certificate status to verified on upload.
- Click Create
Hardware setup #
Connect 4-20mA Diesel Fuel Tank Level Sensor to 8 pin connector’s 4-20mA analog input and powered the sensor using 12V output as figure 1.
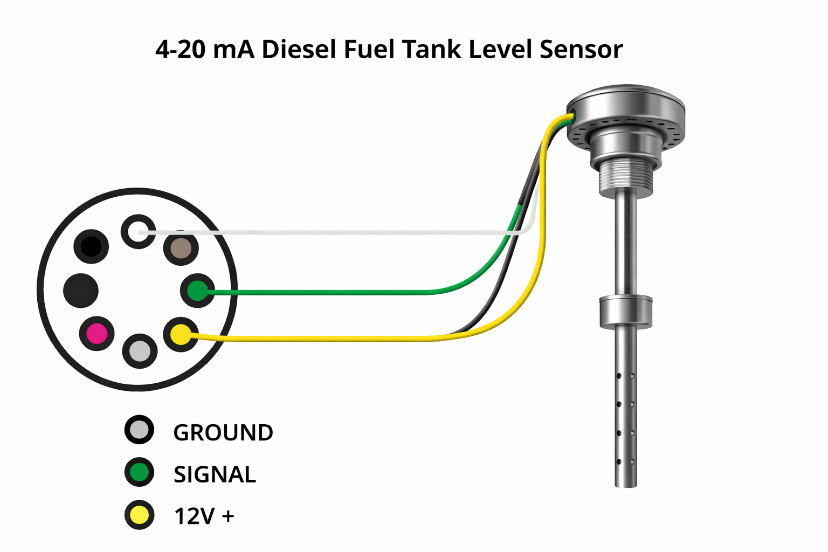
After that change the power source to battery power by setting the on-board jumper to position 1.
Software Setup #
Development Environment #
Required libraries:
- STM32LowPower
- TinyGSM
- ArduinoJson
- Adafruit_ADS1X15
- RTClib
SIM7070 Modem Configuration #
#define TINY_GSM_MODEM_SIM7070
TinyGsm modem(Serial1);- SIM7070 communicates with STM32 via UART (Serial1)
- Auto baud detection is enabled
- APN is configured:
const char apn[] = "dialogbb";- Cellular connection is established before any TLS or MQTT operation
Azure IoT Certificates Used #
Certificates embedded in firmware (PEM format):
| Certificate | Variable | Purpose |
|---|---|---|
| Root CA | rootCAPem | Verifies Azure IoT Hub server |
| Device Certificate | deviceCertPem | Authenticates device to Azure |
| Private Key | deviceKeyPem | Used for TLS client authentication |
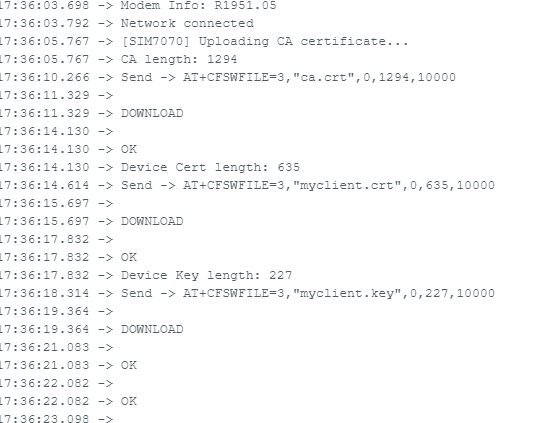
Upload Certificates to SIM7070 #
Function used:
bool sim7070_upload_ca()What this function does:
- Initializes SIM7070 file system
- Uploads certificates using AT commands:
- ca.crt → Root CA
- myclient.crt → Device certificate
- myclient.key → Device private key
- Verifies uploaded certificates using: AT+CCERTLIST
Azure IoT Explorer (Telemetry Verification) #
- Download Azure IoT Explorer from GitHub
- Choose the installer based on your OS:
- Windows → .exe
- Linux → .AppImage
- macOS → .dmg
- Install the application and launch Azure IoT Explorer.
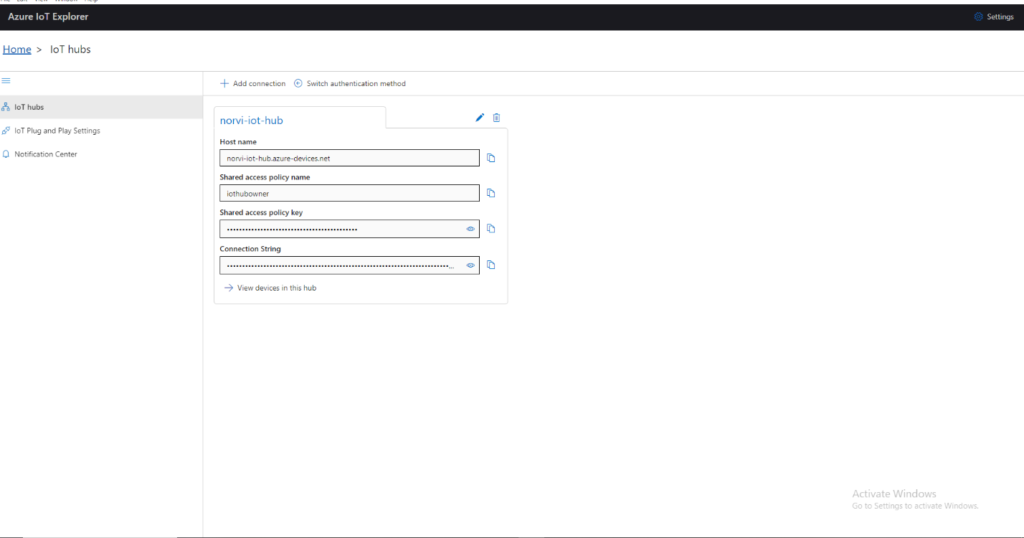
- In the Azure portal:
- Go to IoT Hub → Shared access policies → iothubowner
- Copy the IoT Hub connection string
- In Azure IoT Explorer:
- Click Connect
- Paste the IoT Hub connection string
- Verify successful connection to the IoT Hub
- Use Azure IoT Explorer to:
- Monitor device connection status
- View telemetry messages
Device Firmware / Code Implementation #
System Initialization Flow #
Executed inside setup()
- LowPower.begin();
- Modem_Init();
- sim7070_upload_ca();
- sim7070_init_tls();
- azure_mqtt_configure();
- azure_mqtt_connect();
Execution order:
- Low-power framework initialized
- SIM7070 powered ON and registered to network
- Certificates uploaded to modem
- TLS stack initialized
- MQTT configured for Azure IoT Hub
- Secure MQTT connection established
TLS Configuration (X.509) #
Function:
bool sim7070_init_tls()TLS settings applied:
- TLS version: TLS 1.2
- Server authentication enabled
- Time validation bypassed (SIM7070 has no RTC sync)
+CSSLCFG="sslversion",0,3
+CSSLCFG="authmode",0,2
Azure MQTT Configuration #
Function:
bool azure_mqtt_configure()Key Azure MQTT parameters:
- Broker: norvi-iot-hub.azure-devices.net
- Port: 8883
- Client ID: EC-M12-BC-C6
- Username format:
<iothub>.azure-devices.net/<device-id>/?api-version=2021-04-12- TLS enabled using: +SMSSL=1,”ca.crt”,”myclient.crt”
- No password is required for X.509 authentication
MQTT Connection #
Function:
bool azure_mqtt_connect()- Establishes MQTT over TLS
- Performs full X.509 certificate validation
- Connection timeout: 20 seconds
- Confirms successful handshake with Azure IoT Hub
Sensor Data Acquisition #
Code section:
adc1 = ads1.readADC_SingleEnded(1) * mA_Factor;Calculated values:
- Fuel percentage
- Fuel height (mm)
- Battery voltage
- Sensor fault detection
Telemetry Payload Format #
JSON payload created using ArduinoJson:
{
  "fuel_level_percent": 72.5,
  "fuel_level_mm": 860,
  "battery_voltage": 3.72,
  "fuel_sensor_fault": false
}
Published to Azure topic: devices/EC-M12-BC-C6/messages/events/
Function used:
azure_publish_payload()Power Management & Sleep Cycle #
After data transmission:
- Booster disabled
- ADC & I2C powered down
- SIM7070 turned OFF
- STM32 enters deep sleep
LowPower.shutdown(3000);Please refer below configured github link for full program : EC-M12-BC-C6-C-A-Azure_IoT_Hub_Secure_X509_TLS
Testing & Verification #
This section explains how to verify that the EC-M12-BC-C6-A device successfully connects to Azure IoT Hub using X.509 certificates, publishes telemetry, and how to troubleshoot common issues.
Connect Device and Publish Data #
Power-Up & Network Verification
- Power ON the EC-M12-BC-C6-A device
- Observe serial logs via USB debug port
- Confirm the following messages appear in order:
Sensor Data Transmission Verification
- The device reads:
- 4–20 mA fuel level sensor
- Battery voltage
- JSON payload is constructed: serializeJson(doc, jsonStr);
- Payload is published using azure_publish_payload(jsonStr.c_str());

Using Azure IoT Explorer to Monitor Telemetry #
Connect Azure IoT Explorer
- Open Azure IoT Explorer
- Connect using IoT Hub connection string
- Select:
- Devices → EC-M12-BC-C6
Subscribe to Device Events
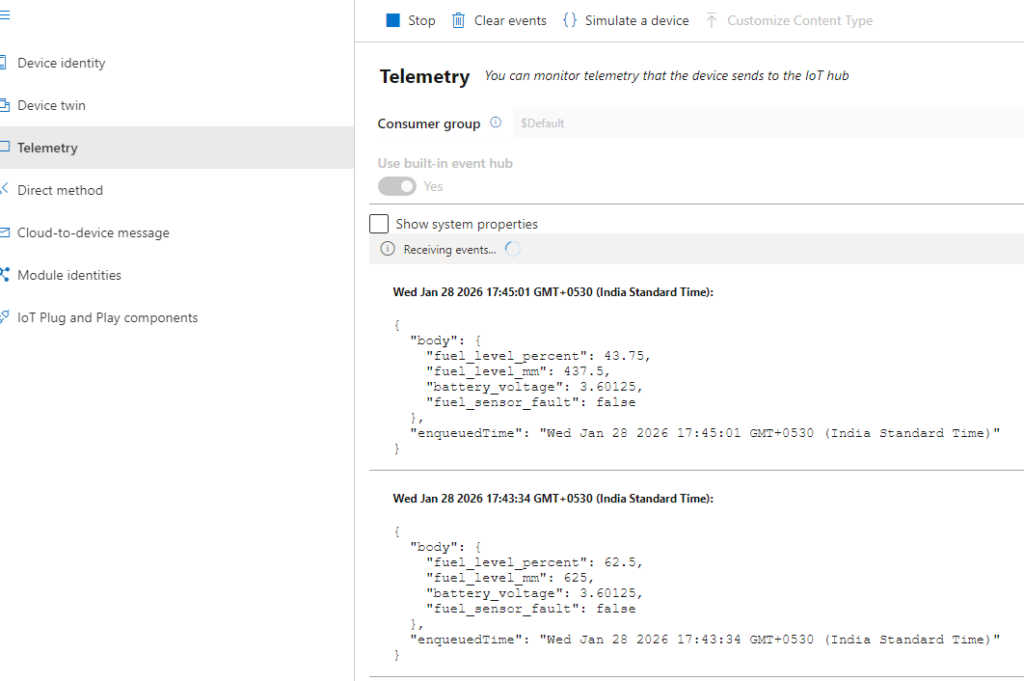
- Click Telemetry tab
- Select Start
- Azure IoT Explorer subscribes to:
- devices/EC-M12-BC-C6/messages/events/
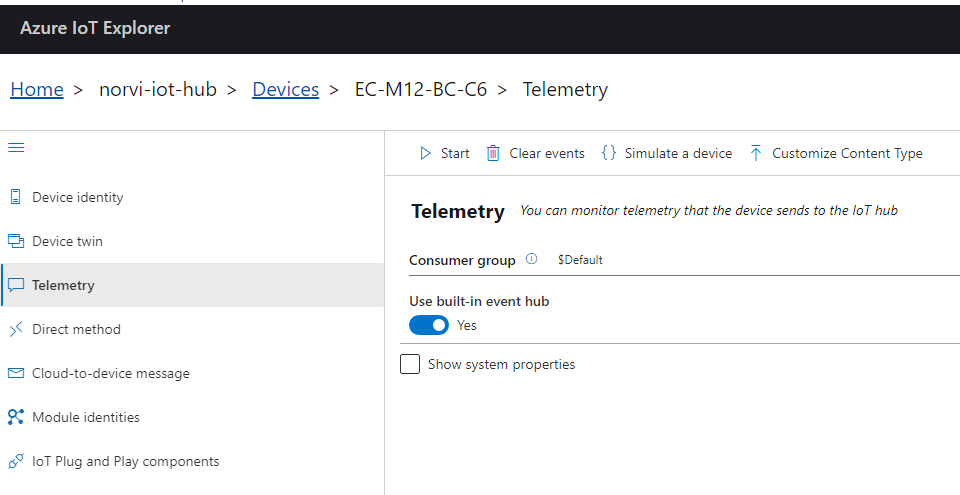
Verify Payload Reception
Validate:
- Data values are realistic
- Updates arrive after each wake cycle
- No dropped or malformed messages
Debugging Tips #
Common Connection & Certificate Issues
| Issue | Possible Cause | Solution |
|---|---|---|
| MQTT connect fails | Certificate mismatch | Verify device CN matches Device ID |
| TLS handshake timeout | Wrong CA certificate | Confirm Azure root CA used |
| ERROR after SMCONN | Certificates not converted | Re-run +CSSLCFG=”CONVERT” |
| No telemetry received | Topic mismatch | Ensure correct Azure topic format |
Key Points & Discussion #
Implementation Summary #
The following core components were implemented and verified in this application:
- Low-power MCU firmware with periodic wake–sleep operation
- SIM7070 cellular modem initialization and LTE-M / NB-IoT connectivity
- Secure TLS configuration using X.509 CA-signed certificates
- Azure IoT Hub MQTT connection over TLS (port 8883)
- Secure device identity using Device ID + certificate CN
- Structured JSON telemetry payload generation
- Reliable telemetry publishing to Azure IoT Hub
- Serial logging for debugging and diagnostics
- Power optimization through interface shutdown and sleep modes
X.509 Certificates vs SAS Tokens #
| Feature | X.509 Certificates | SAS Tokens |
|---|---|---|
| Authentication method | Certificate-based | Shared secret key |
| Secret stored on device | SePrivate key only | Primary/Secondary key |
| Key rotation | Not required | Required periodically |
| Cloud-side provisioning | Scalable | Manual per device |
| Security level | High (PKI-based) | Medium |
| Risk if device compromised | Limited | High (key reuse) |
| Recommended for production | Yes | Limited |
Conclusion:
X.509 certificates provide stronger security, better scalability, and lower maintenance effort compared to SAS tokens, making them ideal for industrial deployments.
Security Considerations #
- Device private key never leaves the device
- Root CA is validated by Azure IoT Hub
- Mutual TLS authentication prevents:
- Device spoofing
- Unauthorized access
- TLS encryption protects:
- Sensor data
- Device identity
- No cloud-side shared secrets stored on devices
Suitable for industrial, remote, and mission-critical deployments
Scalability & Fleet Management #
| Aspect | Benefit |
|---|---|
| CA-signed certificates | Enables mass device provisioning |
| Certificate-based identity | No per-device secret handling |
| Azure IoT Hub registry | Centralized device management |
| Identical firmware image | Reduces maintenance overhead |
| Cloud-side revocation | Instant device de-authorization |
This architecture supports:
- Hundreds to thousands of devices
- Automated provisioning pipelines
- Long-term deployments with minimal field updates
Power & Reliability Design Notes #
For more details about Low power reliability, refer application note: EC-M12-BC-C6-C-A 4-20mA sensor low power application
Recommended Best Practices #
- Use unique device certificates per device
- Protect private keys using modem or secure filesystem
- Use Azure IoT Hub DPS for large-scale deployments
- Monitor connection failures and retry counts
- Periodically validate certificate expiration dates


